Hold onto Your Hat! Olympic Wreaths Just in!

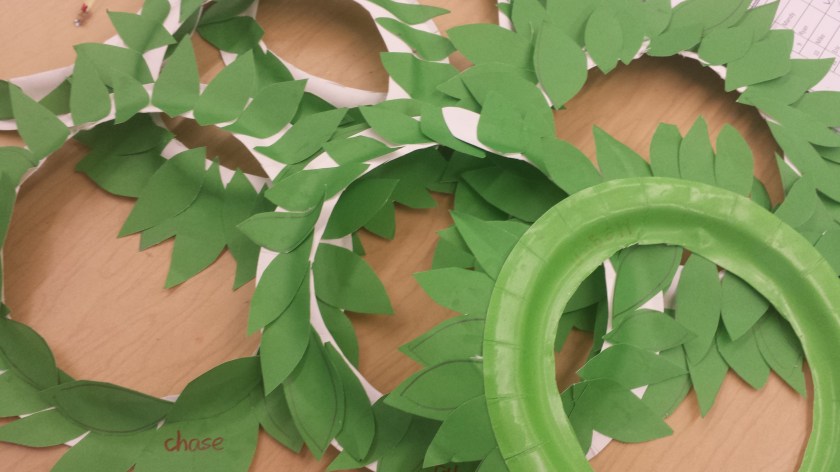
To wrap up our theme of Olympic Games this week (and with the Olympics ending on Sunday), I had my students make Olympic Wreaths in class. I came upon a picture of this online, and found it to be an easy and fun activity that even my staff had fun doing!

Making Olympic Wreaths:

1. You will need sheets of green construction paper, paper plates (white or green) and a pair of scissors. All of these materials can be bought from the Dollar Store.

20160816_101525.jpg

2. Take a sheet of the green construction paper and fold it twice so you end up with a small square.

3. Draw leaves on the green surface of the folded construction paper, filling it up as much as possible.

20160816_101619.jpg

4. Cut out the leaves and store them in a (plastic) container.

20160816_101727.jpg

5. Take your paper plates and cut out the insides. Hold onto these insides for later.

20160816_101737.jpg

6. Put liquid glue onto the insides of the cut-out paper plates and leave one on each table for students to use.

20160816_112337.jpg

7. If available, use flat-nibbed utensils for spreading (other alternatives: Popsicle sticks or dip leaves directly) the glue onto the plate and gluing the leaves one by one.

20160816_112818.jpg

8. Glue leaves in one direction, or both, alternating every few leaves to achieve desired pattern.

9. When wreaths are ready, make sure to write each student’s name in marker. And, enjoy!

20160816_133303.jpg


©booksnnooks.org All Rights Reserved


Olympic-Themed Summer Art: Olympic Torches!

Now, whether you’re a teacher of students aged 3-8 at a camp this summer, or a mom of a couple of kids looking for something to get them in the Olympic spirit, why not try making an Olympic Torch?

This simple (I promise!) art activity is really fun to do, and your children/students can make as many as they like.They could even use them in an opening ceremony of your own Olympic Games! This was found while browsing the internet and is by no means an original concept.

Teachers, to begin, you might consider providing some context for this art activity by showing your students a short clip of the lighting of the Olympic Cauldron. I found a quick one on YouTube that does the trick quite well: Lighting of the Olympic Cauldron – Rio, 2016

Once students have viewed this video clip, you can have them share their ideas on what they saw, seguing into the Olympic Torch. You might even provide some background information for some of your older and more interested students. The official Olympic Games website provides this information: Olympic Torch Relay

The art activity, as I promised, is quite simple. You need only to cut flame shapes out of tissue paper (light or dark orange, yellow, red), as below:

20160809_191954.png

Next, pull a couple of each colour and twist into something of a “flower” as below. Use tape to secure the twisted bottom portion:

20160809_192314.png

Finally, roll a sheet of brown construction paper into a cone, securing with tape. Then, stick the flame into the cone and make sure to use a bit of tape to stick the bottom of the flame to the inside of the cone.

20160809_192414.png

Et voila! Now gather your torches one and all, and parade around!


©booksnnooks.org All Rights Reserved